Best Topaz Video AI Alternatives: 6 Options Tested (2026)

Topaz Video AI is a powerhouse for AI video upscaling and enhancement. It can upscale low-res footage, reduce noise, and interpolate frames for smoother motion. But it's not perfect for everyone. Many creators have gripes about Topaz: it's expensive and now subscription-based, it's GPU-hungry, and it can be sluggish on longer projects. Some also find the results aren't always consistent, especially on very old or heavily compressed clips.
The good news is there are several solid alternatives out there, each with their own strengths. Whether you want something cheaper, a cloud tool that doesn't need a powerful PC, an open-source solution, or a lightweight app for quick enhancements, there's likely an option for you.
Here are six of the best Topaz Video AI alternatives, covering paid and free software, desktop and web apps, and even a mobile-friendly editor. For each, we'll cover pricing, pros and cons, and real-world testing to help you figure out which might be the best fit.
Video Quality Enhancer: The Easiest Cloud-Based Solution
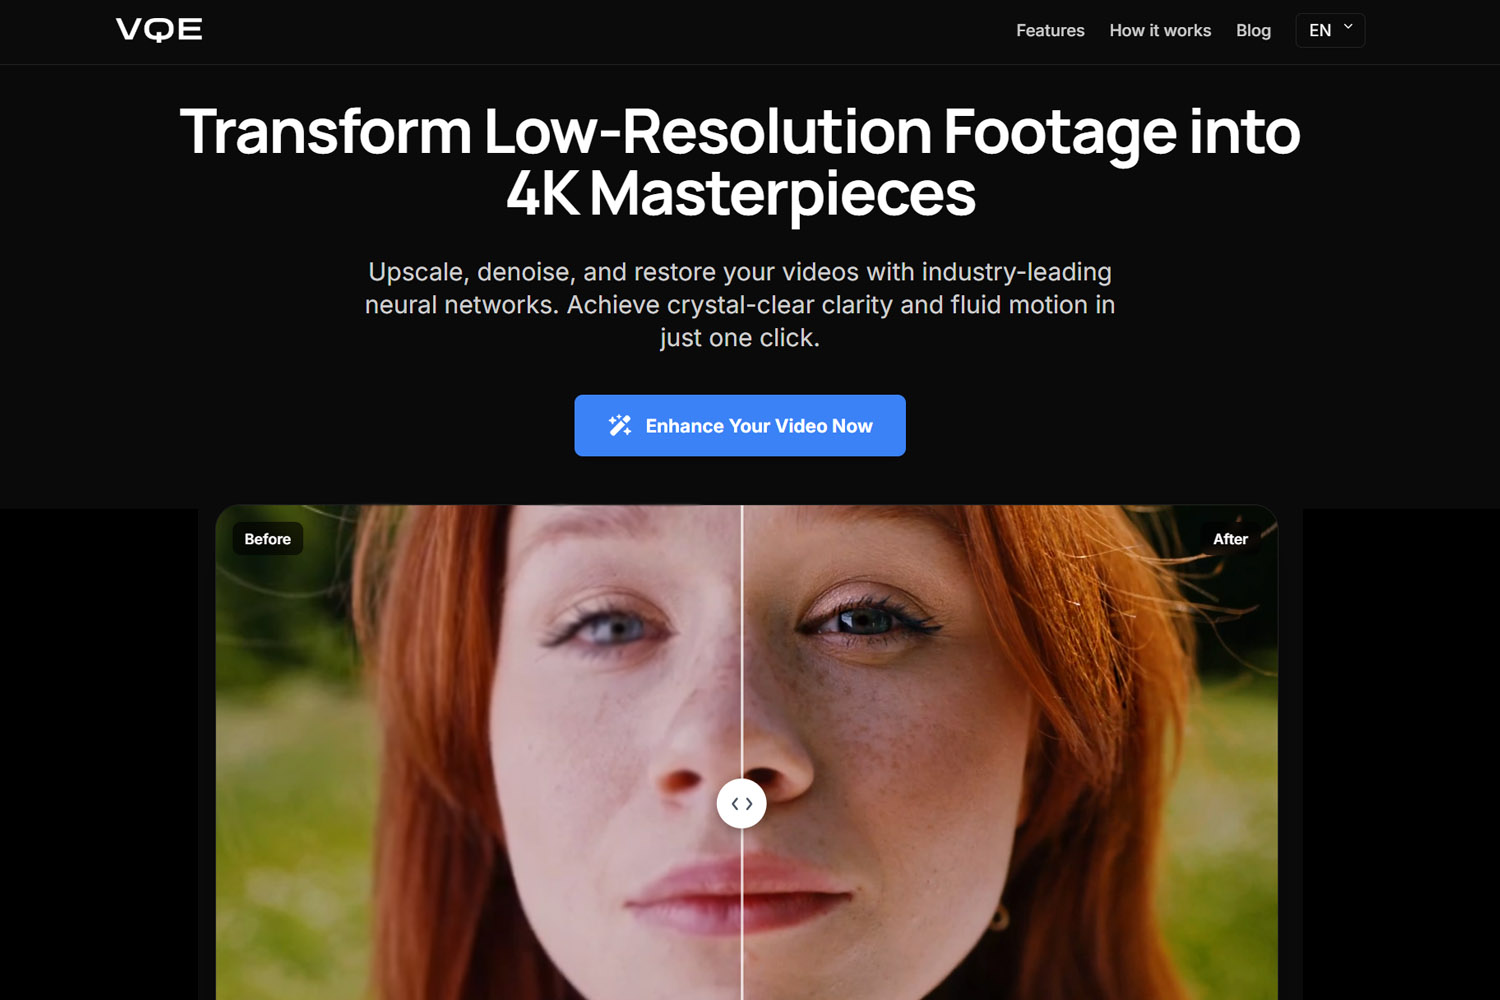
If you want the absolute easiest way to enhance video quality without any hassle, Video Quality Enhancer is hard to beat. It's a cloud-based tool that delivers industry-leading quality with zero setup, no account required, and no complicated settings to figure out. You just upload your video, choose your target resolution and frame rate, and you're done.
What makes Video Quality Enhancer stand out is its simplicity. There are no AI models to choose from, no parameters to tweak, and no learning curve. The tool automatically uses the best possible settings to deliver the highest quality output every time. You don't need to know anything about video enhancement to get professional results.
The workflow is dead simple. Upload your video, select your desired output resolution up to 4K and frame rate up to 60fps, and you'll get an instant price quote based on the video's duration and your chosen settings. Once you pay, processing starts immediately. When it's done, the enhanced video is automatically sent to your email address, the same one you used for payment. No downloads, no waiting around, no complicated interfaces.
Pricing
Video Quality Enhancer uses a straightforward pricing model based on video duration and your chosen output settings. There's a fixed price of $1.00 for videos up to 50 seconds at 720p or 1080p at 30fps. After that, pricing is per minute and varies based on resolution and frame rate:
1080p:
- 30fps: ~$1.20 per minute
- 60fps: ~$2.60 per minute
4K:
- 30fps: ~$5.30 per minute
- 60fps: ~$10.80 per minute
The best way to get an accurate quote is to simply upload your video and select your desired settings. The tool will calculate the exact price instantly, so there are no surprises.
Pros
Zero Setup Required: This is the easiest video enhancer to use, period. No account creation, no software installation, no learning curve. Just upload and go. If you can use email, you can use Video Quality Enhancer.
Industry-Leading Quality: The tool delivers professional-grade results automatically. You don't need to know which AI model works best for your content or tweak any parameters. It just works, and it works well.
Instant Pricing: No guessing games about cost. Upload your video, pick your settings, and you'll see the exact price immediately. This transparency is refreshing compared to tools with confusing credit systems or hidden fees.
Fast Processing: Each minute of video typically takes about 1 to 2 minutes to process, though this can vary based on your chosen settings. Since it's cloud-based, you don't need to keep your computer running or tie up your hardware.
No File Size Limits: Unlike many cloud services, Video Quality Enhancer doesn't impose arbitrary file size or duration limits. Whether you're enhancing a 30-second clip or a feature-length film, the tool can handle it.
Automatic Email Delivery: Once processing is complete, your enhanced video is automatically sent to your email. No need to check back on a website or worry about download links expiring. It's just there in your inbox when it's ready.
Cons
Cloud-Only Processing: Since everything happens in the cloud, you need a stable internet connection to upload your video and download the result. For very large files, this can take time depending on your connection speed.
Pay-Per-Use Model: While the pricing is transparent, you pay for each video you enhance. If you're processing lots of footage regularly, the costs can add up compared to a one-time software purchase. That said, for occasional use or one-off projects, it's often more cost-effective than buying expensive software.
No Manual Controls: The tool is designed for simplicity, which means you can't fine-tune individual parameters or choose specific AI models. For most users, this is actually a plus, but if you need granular control over every aspect of enhancement, you might prefer a desktop tool like Topaz or DaVinci Resolve.
Requires Payment Before Processing: You need to pay upfront before the video is processed. While this is standard for cloud services, it means you can't preview the results before committing. However, given the tool's track record for quality, this is rarely an issue.
My Take
During testing, Video Quality Enhancer stood out as the most straightforward option for anyone who just wants to enhance a video without dealing with software, settings, or subscriptions. The ability to upload a video from any device, get an instant price, and have the result emailed automatically is incredibly convenient.
The quality is genuinely impressive. In side-by-side comparisons with other tools during testing, Video Quality Enhancer consistently delivered sharp, clean output that rivals what you'd get from Topaz. The difference is you don't need to know anything about video enhancement to get those results.
The pricing is fair, especially for shorter videos. That $1.00 minimum for videos under 50 seconds makes it perfect for quick social media clips or short projects. For longer videos, the per-minute pricing is competitive with other cloud services, and the transparency is a huge plus.
For anyone looking for the absolute easiest way to enhance video quality with professional results, Video Quality Enhancer is hard to beat. It's not the cheapest option if you're processing hours of footage regularly, but for most people who need occasional enhancement, it offers a solid balance of quality, convenience, and price.
Aiarty Video Enhancer: Affordable All-in-One Upscaler

Aiarty Video Enhancer is a relatively new desktop application that's quickly emerged as a budget Topaz alternative. It aims to match much of Topaz's core functionality, including AI-driven upscaling, denoising, and deblurring, while being more affordable and user-friendly. Aiarty markets itself as delivering Topaz-like results without the heavy system demands or steep ongoing cost.
It supports upscaling videos up to 4K resolution. Topaz can go to 8K, but 4K is plenty for most people. Aiarty also includes handy extras like AI frame interpolation for smooth slow-motion up to 120fps and even an audio denoiser for cleaning up background hiss. There's also an experimental SDR-to-HDR conversion feature, which is a nice bonus if you want to give standard videos more pop on HDR displays.
Pricing
One big draw of Aiarty is its pricing. Topaz Video AI switched to a subscription model, costing about $25 to $58 per month billed annually depending on tier. That adds up to hundreds per year. Aiarty, by contrast, offers a lifetime license for $165, which covers 3 PCs and includes lifetime updates. There's also a $79 per year subscription if you prefer that model.
For roughly half the cost of one year of Topaz, you could own Aiarty outright. That's a compelling deal for budget-conscious users. It's available for Windows and macOS.
Pros
High-Quality Upscaling: In my tests, Aiarty's output quality is on par with Topaz for most use cases, specially for close up shots. It upscales to 4K with sharp detail recovery and minimal artifacts, which is great for breathing new life into old HD or SD videos. It uses a hybrid Diffusion+GAN AI approach that actually generates realistic details, like adding natural-looking skin texture or hair detail, rather than just over-sharpening the image. This helps avoid that overly waxy look that some AI enhancers produce.
Faster on Modest Hardware: Aiarty makes efficient use of your GPU, boasting a Turbo Mode that can drive utilization to 95% and process videos up to 3× faster than some competitors. In testing on mid-range hardware, Aiarty felt noticeably snappier than Topaz for the same clips. That's a huge plus if you don't have a high-end GPU.
Beginner-Friendly: The interface is clean and straightforward. During testing, it was easy to drag-and-drop a video, pick an AI model preset like clarity versus fidelity focus, and start processing without fiddling with dozens of settings. It's much less intimidating to newcomers than Topaz's UI, which often requires tweaking parameters. One Reddit user even called Aiarty a hidden gem that's more beginner-friendly than Topaz, with more of a drag-and-drop feel.
All-in-One Features: Beyond upscaling, Aiarty packs other useful tools. AI denoise and deblur are built in, so you don't need separate modules. It includes frame interpolation up to 120fps for smooth motion, basic color adjustment filters, and the ability to preview the original versus enhanced video side-by-side. It even processes everything offline on your PC for privacy, so you don't need to upload footage to a server.
Cons
Capped at 4K Upscaling: Aiarty's upscaling maxes out at 4K resolution. If you have an 8K TV or are doing filmmaking where 8K output is needed, Topaz or a couple of other tools might be necessary. For 99% of people, 4K is fine, but it's a limitation to note.
Fewer Niche Models: While Aiarty covers the essentials with general upscaler models tuned for different goals, it doesn't yet have some of the ultra-specialized models that others offer. For example, Topaz has a dedicated face refinement model and a video stabilization feature, which Aiarty currently lacks. If your use case involves a lot of shaky footage or distant faces that need extra help, you might miss those extras.
Better with Close-Ups and Medium Shots: It's worth noting that Aiarty tends to perform best on medium shots and close-ups where there's more detail concentration. Wide shots or footage with expansive scenes, like old sports matches or landscape footage, the results don't quite match the quality you'd get from Topaz or Video Quality Enhancer. This isn't a deal breaker, but it's something to keep in mind if your footage consists primarily of wide-angle shots or scenes with lots of background detail.
My Take
During testing, Aiarty Video Enhancer proved to be a cost-effective Topaz alternative. When running old camcorder footage through it, the cleaned-up 4K result was almost as good as Topaz's output, and it rendered faster on mid-range hardware, which was a pleasant surprise. The software feels streamlined, and the lack of complicated settings to manage is a real plus.
It's a solid option for someone who wants high-quality AI upscaling without shelling out hundreds of dollars every year. That said, if you need 8K or you're deep into pro video restoration with very specific needs like advanced stabilization or manual tweaking per scene, Aiarty might not fully replace Topaz or a professional workflow. For most people and everyday projects, though, it hits a sweet spot in quality, speed, and price. The free trial is worth checking out to see what it can do with your footage.
Video2X: Open-Source Upscaling for the DIY Enthusiast
If you're looking for a free alternative to Topaz Video AI and don't mind getting your hands a bit dirty, Video2X is a standout option. Video2X is an open-source project available on GitHub that acts as a front-end to various AI upscaling models. Essentially, it lets you upscale videos and even GIFs using algorithms like waifu2x, Real-ESRGAN, anime4k, and more. These are many of the same underlying techniques found in paid tools, but packaged for the DIY crowd.
It even has experimental support for frame interpolation via third-party scripts, so you can boost frame rates for slow-motion footage. Video2X works on Windows and Linux, though there's no native macOS support unfortunately. It can leverage your GPU if you have NVIDIA CUDA or AMD OpenCL drivers set up.
Pricing
Completely free and open-source. There's no paid version at all. You just download it and you're good to go. Being open-source also means if you're adventurous, you can modify it or update the AI models manually. The trade-off is there's no dedicated customer support, but there is a community of users on forums and GitHub.
Pros
Free of Cost: It's hard to beat $0. Video2X lets anyone upscale videos without paying a cent or dealing with trial watermarks. This makes it great for students, hobbyists, or those one-off projects where you can't justify an expensive tool.
Highly Customizable: Because it's open-source, you have a lot of flexibility. You can swap in different AI models or engines depending on your content. For example, there are models specifically good for anime line art versus live-action, and Video2X lets you choose which to use per task. Advanced users can fine-tune parameters or even script the process. It's a tinkerer's delight.
Active Community Improvements: The project benefits from contributors adding updates and fixes. It may not have a company behind it, but enthusiasts keep it evolving. If a new state-of-the-art upscaling model comes out, chances are someone will figure out how to plug it into Video2X.
Decent Quality Upscaling: With the right model, Video2X can produce results comparable to some paid tools. In my experience, it especially shines with anime or cartoon footage. I was able to take an old 480p anime clip and upscale it to 1080p with crisp lines and very little artifacting, using a model tuned for 2D animation. Even some low-res game footage and GIFs turned out impressively well.
Cons
Not Very User-Friendly: Video2X provides a GUI, but don't expect polish. The interface is functional but utilitarian. Setting it up can be a bit of an adventure. You might need to install Python, FFmpeg, or specific drivers depending on the version you download. For non-technical users, this setup can be confusing. In short, it's not plug and play like Topaz or other commercial apps.
Windows/Linux Only: Mac users are out of luck for now, unless you try running Linux in a virtual machine or dual-boot. This limitation reduces accessibility for those on macOS who might otherwise love a free tool.
Limited Features: Video2X's focus is primarily on resolution upscaling. It doesn't inherently do the extra stuff Topaz does like dedicated denoising, motion stabilization, or fancy color correction. If your video needs noise reduction or other fixes, you'll have to pair Video2X with other tools in your workflow. It's a specialist, not a one-stop shop.
Can Be Slow: Depending on the AI model you use and your hardware, Video2X can be quite slow on high-resolution outputs. Some of the best quality models, especially ones that add a lot of detail, are very computationally heavy. If you're running on an older PC without a strong GPU, be prepared for long wait times, potentially measured in hours for a few minutes of footage. The flip side of free is often patience.
No Official Support or Updates Schedule: If something breaks or doesn't work, you might have to dig through forums or GitHub issues to troubleshoot. There's no help desk to call. Similarly, updates come when they come, by community effort.
My Take
Video2X is a fantastic option for those who are tech-savvy or on a tight budget. During testing, the ability to pick different models and see how they perform was interesting. On some anime upscales tested, it was hard to tell the difference between Video2X's output and Topaz's, which is impressive.
However, using Video2X requires a bit of willingness to troubleshoot. It's not the kind of polished experience you'd suggest to someone who just wants quick results without any technical setup. During testing, getting the best results for live-action videos took some trial and error, and potentially pairing it with other tools for pre-denoising. It's definitely not the fastest solution either. One test job ran overnight on a mid-range PC.
In summary, if you're okay rolling up your sleeves, Video2X can save you a lot of money and deliver quality upscales, especially for animation or simple projects. But if you value a slick interface and hand-holding, you might lean toward a paid app instead.
TensorPix: Cloud-Based Video Enhancer in Your Browser
TensorPix offers a completely different approach to video upscaling. Instead of installing heavy software on your computer, TensorPix runs entirely in the cloud via your web browser. You upload your video to their website, select what enhancements you want, and their GPU servers handle the processing. Once done, you download the enhanced video.
This makes TensorPix a convenient Topaz alternative for those who don't have a powerful PC or who are on, say, a MacBook Air or a work computer where you can't install software. It supports upscaling videos to HD or 4K, offers some denoising and sharpening, and even has the ability to boost frame rate to 60 FPS for smoother motion on applicable footage. Essentially, it's an on-demand AI video enhancer that you can use from almost any device.
Pricing
TensorPix has a free tier, which is great for testing but comes with limitations. Usually a small amount of video can be processed for free, often with a watermark or lower priority in the queue. For heavier use, they offer paid plans starting around $5 to $6 per month for a basic subscription.
However, their pricing can be a bit confusing because it's credit-based. You purchase credits or a subscription that gives you a certain number of processing minutes or tasks. Higher tiers, costing more per month, grant faster processing and more video length. Some sources cite Standard, Premium, and Elite plans ranging from about €11 up to €61 per month with increasing capabilities.
The bottom line is it's free to try, but you'll pay, and potentially pay quite a bit, for heavy or long-term use. It's kind of like how you'd pay for cloud storage or rendering time.
Pros
No Hardware Required: The biggest perk is you don't need a fancy computer or GPU. I was able to run TensorPix from a basic laptop and even a tablet, since all the heavy lifting happens on their servers. This makes it accessible to virtually anyone with an internet connection. If Topaz or other desktop apps won't even run or run too slowly on your machine, TensorPix is a lifesaver.
Zero Install and Cross-Platform: Because it's web-based, it works on Windows, Mac, Linux, even mobile browsers in some cases. No need to install large programs or worry about compatibility. This also means you can start an upscale from one device and later download the result on another.
Easy to Use: The interface is pretty straightforward. You upload a video file, and the site walks you through choosing what you want to do, like upscale to 1080p or 4K, stabilize, or frame interpolation. It's user-friendly for beginners. It's kind of a set-it-and-forget-it process. There aren't a ton of dials to tweak, which for many is a plus.
Decent Results for Most Content: In terms of quality, I found TensorPix's output comparable to mid-tier desktop apps. It definitely improved clarity and resolution on both real-life footage and cartoons I tried. It even has presets for different content types, like a mode for old videos versus a mode for animation. The fact it can also do 60fps frame boosting is nice if you want smoother playback for slow-mo scenes.
No Upfront Cost to Try: Since there's a free trial tier, you can test it on a sample of your footage without pulling out a credit card. This is a low-risk way to see if the results meet your expectations before paying.
Cons
Internet and Patience Required: Using TensorPix means you have to upload your video to their server and download the result. For large video files, say you want to enhance a 20-minute 1080p video, this can be time-consuming and bandwidth-intensive. A slow or unstable internet connection can really hamper the experience. I had a clip take an hour to upload, process, and download due to my network speed. So it's not as immediate as a local app that just crunches on your PC.
Ongoing Cost for Heavy Use: While the base subscription is affordable, if you have lots of footage to upscale, the credit system can get expensive. Some users have noted that the credit-based plans end up pricier than expected for big projects. It's the cloud equivalent of a taxi meter. The more you use it, the more you pay. This can turn off those who prefer a one-time purchase software.
Limited Fine-Tuning: TensorPix is designed for simplicity, which means it lacks the granular controls an expert might want. You can't, for example, choose between a dozen AI models or manually adjust the denoise strength. If you want that level of control, you'll find the tool a bit black box. It decides the specifics of enhancement for you. That's okay for casual use, but pros might feel it's too restrictive.
Potential Over-Sharpening: On a couple of my test videos, I noticed that the enhanced output had a bit of the over-sharpened look. The AI maybe went too heavy trying to create detail, resulting in some halos or artificial-looking textures. It wasn't terrible, but side-by-side with a Topaz result, I could see a slightly more processed appearance. This tended to happen on faces or text in the video where the AI's attempt to clarify things overshot. Your mileage may vary by content.
Privacy Considerations: Uploading videos to a cloud service may not sit well if your footage is confidential or personal. TensorPix does processing on their servers, so you are trusting a third party with your content. They do advertise privacy, but it's something to keep in mind. If you're dealing with sensitive family videos or client footage, an offline tool might be preferable.
My Take
TensorPix is a convenient upscale-as-a-service solution that works well for people who either have low-end hardware or just need an occasional enhancement without investing in software. During testing, uploading a video from a basic notebook and getting results that looked like they were processed on a high-end rig was impressive. That's a real advantage for those without powerful hardware.
The quality was solid for most test footage, though not quite as crisp as Topaz or Aiarty on very challenging clips. The major drawback is the waiting involved with big files, and the fact that processing lots of videos would rack up costs. For someone with powerful desktop hardware, local processing might be faster, but TensorPix serves as a solid fallback option.
Overall, if you don't mind cloud processing and potentially paying per use, TensorPix is one of the easiest ways to upscale a video. No installs, no compatibility issues, just results in your browser. It won't give you the fine-grained control of a pro app, but for a lot of folks, not having to tinker is actually a plus.
CapCut: Mobile-Friendly Video Enhancement
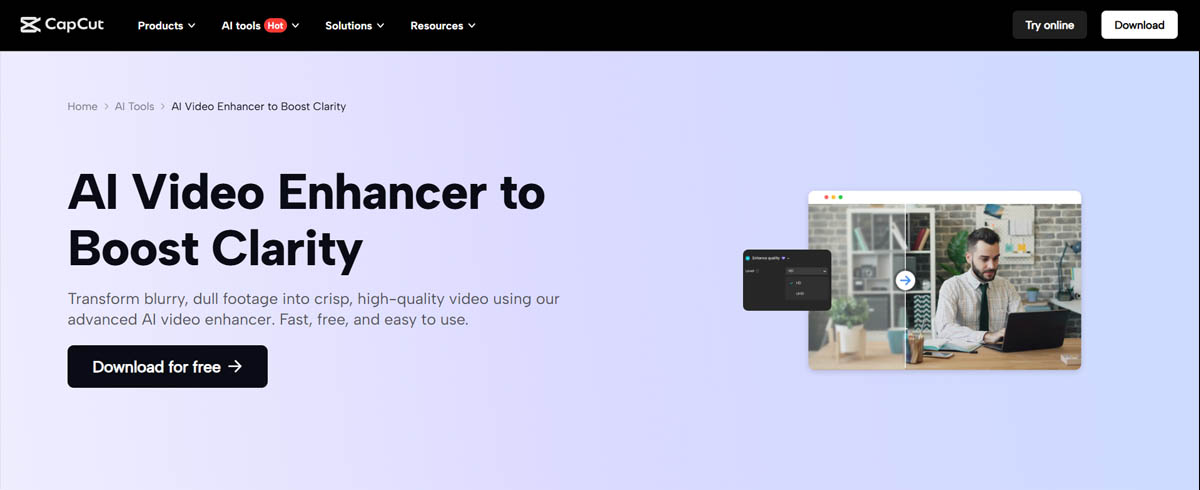
CapCut might surprise some readers on this list, because it's not a dedicated upscale tool like the others. It's actually a popular video editing app by the creators of TikTok that has some AI enhancement tricks up its sleeve. The reason it earns a spot here is its sheer convenience and accessibility.
CapCut is available on mobile iOS and Android, on desktop Windows and Mac, and even as a web app. It's widely used for editing short-form videos, and ByteDance, the company behind it, has integrated AI features like an HD Upscaler filter, noise reduction, stabilization, and even things like Smart HDR and color adjustment into the app.
In simpler terms, you can import a video into CapCut and apply an AI-powered enhance or upscale effect to improve its quality, then export, all within the same app you use to cut and caption your video. This makes it a handy one-stop solution for casual use, especially for social media content creators.
Pricing
CapCut's core features are free, which includes basic editing and some AI enhancements. You can download it and use it without watermarks for standard definition or 1080p projects. However, the CapCut Pro subscription, about $9.99 per month in the US, varies by region, and is needed to unlock a few key things: 4K resolution export, AI upscaling at full quality, and certain advanced filters or effects.
On the free plan, you can still test the upscaler, but final exports in the highest quality might be watermarked or limited to lower res. The Pro version also removes any export watermarks and gives access to a broader music and effects library. Compared to Topaz, CapCut's price is low, and many users will find the free version sufficient for light use.
Pros
Widely Accessible: CapCut is one of the few solutions that works on your phone. If you film something on your smartphone and want to upscale or enhance it right there, CapCut lets you do that. It's also on PC and Mac, so you can seamlessly switch to a bigger screen. This cross-platform flexibility is fantastic. I've started edits on my phone and finished on my laptop.
All-in-One Editing Plus Upscaling: Unlike the other tools that just upscale, CapCut is a full video editor. So you can do your trimming, add music and captions, apply filters, and upscale all in one workflow. This is great for speeding up a social media video workflow. For example, I took a grainy 720p vlog clip, upscaled it to 1080p with CapCut's enhance feature, added titles and music, and exported, all without needing multiple apps.
Beginner-Friendly: CapCut's interface is designed for a mainstream audience, think TikTokers and YouTubers, so it's very easy to use. Sliders for adjustments, one-tap enhance options, straightforward timeline editing, no technical jargon. If Topaz or DaVinci Resolve intimidate you, CapCut will feel like a breath of fresh air.
Free to Try: The fact that you can do a lot without paying is a huge plus. You can experiment with the AI upscale on a short clip for free. Even the Pro price, around $10 per month, is far cheaper than Topaz's subscription. If you only occasionally need 4K upscaling for your social videos, you could even just subscribe for a month when needed.
Decent Quality for Small Projects: CapCut's AI enhancements do make a visible difference on low-res phone videos or simple content. It can sharpen a slightly blurry selfie video or smooth some grain in a dark clip. For content destined for TikTok or Instagram, the quality gain is often good enough, given those platforms' compression.
Cons
Quality Not on Par with Pro Upscalers: Let's be clear. CapCut's upscale is not magic. In fact, some users, especially those who have used Topaz or others, find that CapCut's upscaled results can look artificial or overly smooth. One Reddit comment bluntly said CapCut's upscales look terrible compared to Topaz. In my own tests, CapCut's enhance made a nice improvement on some footage, but it definitely lacked the fine detail restoration that Topaz or Aiarty achieved. It might apply a kind of noise reduction plus sharpening that is fine for casual viewing, but if you pixel-peep, it's inferior. So it's okay for a quick boost, but don't expect miracles for really low-quality sources.
Pro Subscription for 4K or Full AI: The free version, while great, won't let you export 4K or use some of the fanciest AI effects without upgrading. If you try to upscale a video to 4K on the free tier, you'll either be limited to 1080p or get a watermark. So to fully replace Topaz with CapCut for high-res output, you'll need to pay that monthly fee.
Cloud Processing and Privacy: When you use CapCut, particularly the AI upscale and some effects, it actually uploads the video to ByteDance's servers for processing, similar to TensorPix's approach. This means you need internet, and your content is going through cloud servers. Aside from speed concerns, some people are wary about privacy here. ByteDance's terms are known to be quite broad, potentially giving them rights to content you upload. If you're editing a sensitive video, you might not be comfortable using CapCut's cloud features.
Not Specialized for Restoration: CapCut is built for modern digital videos, like phone clips or screen recordings, not for painstaking restoration of old footage. It lacks advanced controls. You can't choose specific AI models, and there's no way to address issues like interlacing or heavy noise beyond a simple filter. So it's not the best choice if you have, say, a bunch of old VHS recordings to upscale. A specialized tool would do better.
Resource Use on Mobile: While the app is free, keep in mind doing AI upscaling on your phone can be slow or heavy and will drain battery. Though a lot is offloaded to the cloud, some processing might still strain older phones. On desktop, CapCut is relatively light, but on mobile, I usually plug in my phone for longer exports.
My Take
CapCut works well as the casual creator's alternative. During testing, it proved useful for quick projects like editing short-form content. The ability to add an AI upscale or stabilization in a couple taps is super convenient. When comparing a 720p video upscaled by CapCut versus by Topaz during testing, the Topaz one was clearly more detailed and cleaner. But for content destined for online platforms where viewers likely watch on a tiny phone screen and the video will be compressed anyway, CapCut's version was perfectly fine and much faster to process.
If you're serious about quality or doing professional work, CapCut won't replace a tool like Topaz or Resolve. But for everyday videos, especially created on your phone, CapCut is a surprisingly capable free tool that covers the basics of upscaling and enhancement. Just temper your expectations on the output quality. It's like the fast-food of video upscaling, quick and tasty for what it is, but not a gourmet meal.
DaVinci Resolve: Pro Editing Suite with Powerful Upscaling
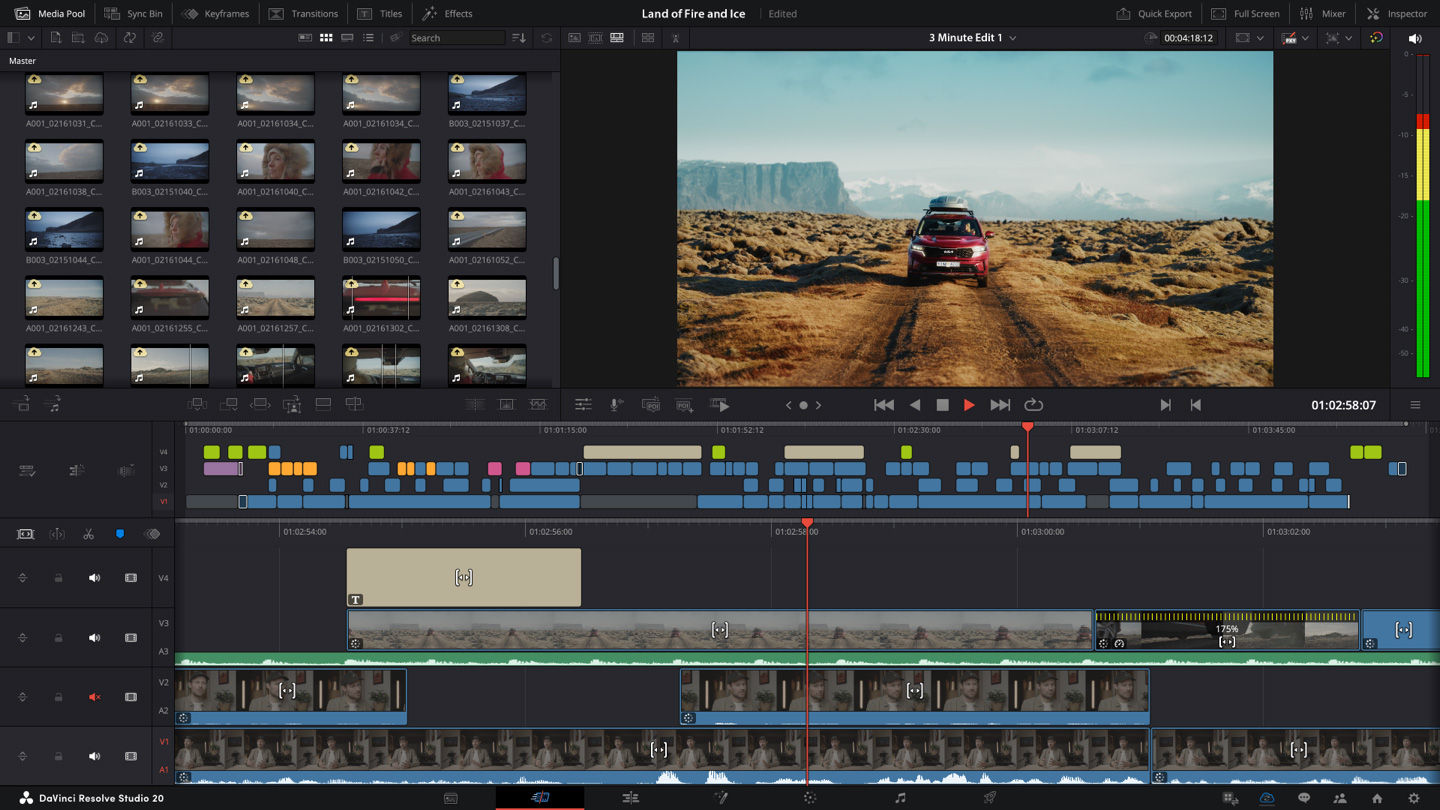
DaVinci Resolve is well-known in the film and video industry as a top-tier professional editing and color grading suite, and it also doubles as a formidable video enhancement tool for those willing to put in the work. Unlike the other alternatives listed, Resolve isn't a dedicated AI upscaler. Instead, it offers a feature called Super Scale for upscaling, along with an arsenal of manual enhancement tools like sophisticated noise reduction, sharpening, motion blur reduction, and color correction.
In essence, Resolve gives you manual control to achieve results that can rival what Topaz's AI does automatically. It's a different approach. You won't just push a single Upscale button, though Super Scale is pretty straightforward to apply. Instead, you can combine various processes to restore and improve video quality.
Resolve comes in two versions: a free version that is extremely capable and free forever, and a paid Studio version, a one-time $295 purchase, that unlocks advanced features like better noise reduction algorithms, HDR support, and higher-resolution Super Scale upscaling up to 8K.
Pricing
The Free version of DaVinci Resolve is almost a steal. It includes most of the editing and grading tools, limited to output at 4K resolution max, and slightly cut-down noise reduction. Many casual and even semi-pro users find the free edition does everything they need.
The Studio version costs $295 one-time, which might seem high initially, but it's a lifetime license with all future updates, no subscription. Considering this is a full professional suite, $295 is actually very competitive. Adobe Premiere plus After Effects would cost more than that each year via subscription.
If you're mainly after upscaling, note that 4K Super Scale is available in the free version, but 8K Super Scale might require Studio, as Studio removes the output resolution cap. Also, Studio is needed for the best noise reduction tools and some AI magic like the Neural Engine features.
Pros
Professional-Grade Results: With the right settings, Resolve's tools can enhance video quality to an extremely high level. Its Super Scale upscaling, which offers 2×, 4×, even 8× upscaling, does a fantastic job sharpening and increasing resolution. It was originally designed so editors could incorporate old HD footage into 4K projects seamlessly. Additionally, the temporal noise reduction in Resolve, especially in Studio, is among the best out there for cleaning up grainy footage. You have fine control over every parameter, which means a skilled user can often achieve better final quality than one-size-fits-all AI by manually tweaking for each scene.
Lots of Enhancement Tools: Resolve brings an entire toolkit. Besides upscaling, you can do color grading to bring out details in shadows and highlights, correct faded colors, motion stabilization, hue versus saturation adjustments, sharpening, selective blurring, and more. If you have an old or poor-quality video, you can address multiple issues in one program, not just resolution, but color and stability too. It's like having a full restoration lab at your fingertips.
Free Version Available: The fact that you can get most of this power without paying a cent is incredible. The free Resolve will let you upscale to 4K, which covers most use cases. So if you're on the fence, you can download Resolve for free, try out Super Scale on a clip, and see if the quality meets your needs.
No Subscription, Cross-Platform: Resolve Studio's one-time purchase is great for those who hate subscriptions. Buy it once, use it forever. I've been using Studio for years and all upgrades have been free. Also, Resolve runs on Windows, macOS, and Linux, which is excellent for compatibility. You can even use the same license on two machines at once, like a desktop and a laptop.
Full Editing Suite: Upscaling aside, you're also getting one of the best video editors out there. If you're someone who not only wants to enhance videos but also cut them, add effects, mix audio, and more, Resolve can do it all. You won't need to round-trip between different programs. This is why a lot of professionals might choose Resolve. It's one tool to rule them all, rather than using Topaz for upscaling, then another program for editing.
Cons
Steep Learning Curve: Let's not sugarcoat it. DaVinci Resolve is professional software, and it will feel complex to newcomers. The interface has tons of panels and options. Using Super Scale itself is easy, just a couple clicks in clip settings, but getting the most out of Resolve's enhancements, like dialing in the perfect noise reduction or color grade, takes practice and knowledge. If you've never used high-end editing software before, expect to spend time watching tutorials and experimenting. It's like getting behind the cockpit of a plane versus driving a car. More power, but more to manage.
Requires Powerful Hardware: Resolve does a lot, and it expects a decent machine, especially for things like real-time playback of high-res footage or intensive noise reduction. In my experience, GPU power and plenty of RAM are important for smooth operation. If Topaz was taxing your system, Resolve might not magically be lighter. In fact, certain tasks, like using 4× Super Scale on a 30-minute video with heavy noise reduction and multiple nodes of color grading, can push a PC to its limits. The free version also doesn't support hardware acceleration for some codecs, which can make it slower on weaker hardware. So ideally, use Resolve on a capable workstation to avoid frustration.
Less Automated: Resolve is not an AI does everything for you solution. While it has some AI, in Studio the Neural Engine features can do things like auto color matching, for the most part you are in control of every setting. This means achieving the best result might involve manual tweaking. For example, you might apply Super Scale and then add a sharpening node and tune the radius to get the crispness you want, then use noise reduction if upscaling boosted the noise too. It's rewarding when you get it right, but if you prefer a one-click enhance, Resolve will feel like overkill.
Advanced Features Cost Money: The free Resolve is generous, but a few relevant things are missing. The best noise reduction, Temporal NR, and the full use of the Neural Engine AI features are in Studio. Also, if you wanted to output 8K or use certain GPU-accelerated decoding, you might need Studio. $295 is far cheaper than a Topaz subscription in the long run, but it's still a chunk of money upfront. If you only care about upscaling and not the rest, that price might feel high compared to something like Aiarty at $165 or Topaz's $299 per year.
My Take
During testing, DaVinci Resolve proved to be a powerful option, but it's clearly overkill for just upscaling a casual video. Resolve shines when you want ultimate control and you're working on a serious project. For example, when testing with old 480p family videos, bringing them into Resolve, using Super Scale 2× to get to 960p, doing noise reduction, slight sharpening, and color tweaks, then upscaling again on export to 1080p produced stellar results. But it took time to fine-tune, and an automated AI tool wouldn't have gotten everything exactly the same way.
On the flip side, for a quick clip that just needs a quality bump, it's probably overkill to launch Resolve and set up a project for it. That's where something like Topaz or Aiarty is simpler. So if you're already comfortable with video editing or willing to invest time to learn, Resolve can produce broadcast-quality upscaling and enhancements. It's a strong choice for those who want creative control or need to integrate upscaling into a larger editing process. But if you never plan to touch color wheels or edit timelines, a dedicated AI tool might serve you better with far less effort. In any case, Resolve being free to try means it's worth a shot, just be ready to climb the learning curve.
FAQ: Common Questions About Topaz Alternatives
What's the best free alternative to Topaz Video AI?
If you're looking to spend nothing, Video2X is the top free choice for AI upscaling. It's open-source and can leverage many of the same AI models behind the scenes. However, it's a bit technical to use and Windows or Linux only. Another free route is to use CapCut. Its basic version lets you upscale to 1080p without paying, which might be enough for casual needs. The quality is decent but not as good as Topaz. DaVinci Resolve Free also technically lets you upscale via Super Scale to 4K for free, but it's more for those willing to tackle pro software.
So for most people, Video2X is the closest free analogue to Topaz's enhancement. Great results, but you have to work for them. CapCut is free and super easy, but with more modest improvement in quality.
Do I need a powerful GPU to upscale videos with these tools?
It depends on the tool. Traditional apps like Topaz, Aiarty, AVCLabs, HitPaw, and others do rely on your GPU for acceleration. Having a good NVIDIA or AMD graphics card will significantly speed up processing and sometimes is even required for high-end models. If you have only a basic laptop with no discrete GPU, those apps will still run using CPU, but very slowly, or sometimes not at all for big resolutions.
In that case, cloud-based solutions like Video Quality Enhancer offload the work to servers. The downside is you must upload your video and possibly pay per use, but you won't be stuck waiting days for a result. DaVinci Resolve benefits from a strong GPU as well. In fact, for smooth editing experience and using Super Scale or noise reduction, a decent GPU is almost a must.
So in summary, a beefy GPU is very helpful for local AI upscaling like Topaz, Aiarty, Video2X, and Resolve, but if you don't have one, consider cloud services or simpler mobile apps which are designed to work around that.
Which video upscaler works best for anime or cartoons?
For animation, anime, cartoons, game sprites, and similar content, Video2X and similar tools can be excellent because you can use specialized models like Anime4K or waifu2x that are trained to upscale line art and 2D animation. Video2X has often been praised for upscaling anime content with preserved sharp lines and minimal artifacts.
Among paid tools, Topaz Video AI has an Art and CG, computer graphics, model that does well with anime, and HitPaw and AVCLabs have animation-specific models as well. Aiarty doesn't explicitly say anime mode, but its algorithms handle animation nicely too. User reports show it does a fine job on old anime DVDs.
If you're technical, another free option is using waifu2x-extension or Upscayl, an open-source GUI for anime upscaling, which uses similar AI under the hood. In a pinch, even CapCut's enhance can slightly sharpen anime, but the dedicated AI models will yield cleaner results for cartoons.
So Video2X with the right model would be my first try for free anime upscaling, and one of the AI-driven tools with animation models if you don't mind paying.
What is the easiest tool for a beginner to enhance videos?
For absolute ease of use, Video Quality Enhancer is the clear winner. No account needed, no settings to configure, no learning curve whatsoever. You just upload your video, choose your output resolution and frame rate, pay, and get the enhanced video emailed to you. It's literally the simplest option available, and it delivers industry-leading quality automatically.
If you want something plug-and-play on desktop, I'd say CapCut or HitPaw Video Enhancer. CapCut is extremely user-friendly, mobile app style, and requires almost no technical knowledge. Just import and tap an enhance filter. It's limited in quality, but dead simple. HitPaw, not covered above in detail, is another desktop software known for a very simple interface. It has a one-click approach with presets and is aimed at beginners.
Aiarty is also quite easy by design. Its interface is straightforward, and it doesn't overwhelm you with options. On the contrary, tools like DaVinci Resolve are powerful but have a steep learning curve, and Video2X might require fiddling with setups. TensorPix is also beginner-friendly since it's just a web form. The only difficulty is understanding its credit system, but using it is as easy as uploading a file and hitting go.
So for absolute ease, Video Quality Enhancer for cloud-based simplicity, CapCut for quick mobile or cloud use, or a simple GUI enhancer like HitPaw or Aiarty on desktop. These will give you improvements without any technical hassle, whereas more advanced tools let you do more at the cost of complexity.
Final Verdict: Which Alternative Should You Choose?
Choosing the right Topaz Video AI alternative depends on your priorities. Here's a quick breakdown to help you decide:
Choose Video Quality Enhancer if: You want the absolute easiest experience with zero setup, you need industry-leading quality without any technical knowledge, and you prefer transparent pay-per-use pricing. Perfect for anyone who just wants results without the hassle.
Choose Aiarty if: You want Topaz-like quality at half the price, you have mid-range hardware, and you're okay with 4K max output. It's the sweet spot for most people who want desktop software.
Choose Video2X if: You're tech-savvy, on a tight budget, and don't mind some setup work. Especially great for anime and animation.
Choose TensorPix if: You don't have a powerful PC, you need occasional enhancements, and you're comfortable with cloud processing and pay-per-use pricing.
Choose CapCut if: You're a casual creator making social media content, you want an all-in-one editor, and you're okay with modest quality improvements.
Choose DaVinci Resolve if: You're already comfortable with video editing, you want professional control, and you're willing to invest time learning. The free version is incredibly capable.
Each of these tools fills a different niche, and the best choice depends on your specific needs, budget, and technical comfort level. The good news is most of them offer free trials or free versions, so you can test them out before committing.